ABFriday Forum Week 08
The AfterBefore Friday, launched and managed by Stacy Fischer of Visual Venturing gives readers an opportunity to exchange ideas about various post-processing techniques. Each week brings together an interesting and informative selection of images and post-processing techniques. They can be found on Friday mornings at Visual Venturing,
My submission for this week was taken last year along the Oregon Coast during a road trip down the Pacific Highway. The scene depicts Cape Lookout, about 60-70 miles south of the Columbia River. We stopped at the Cape Lookout State Park for a picnic lunch and this was the scene from a table that amazingly was not already taken. As usual with a beach scene, there was a problem with contrasting light. But the clouds over the water and Cape Lookout in the distance combined with the yellow flowers in the foreground made it irresistible.
Unlike last week, when the image required some serious interventions, this week’s choice is a more typical example where we start with a pretty decent image and use a few subtle adjustments to make minor improvements.
At any rate, the main challenge here was during the capture phase: a moderate breeze was causing movement in the flowers in the foreground but I wanted the flowers to be relatively sharp. The normal hyper focal technique of using an aperture of f/16 forced me to boost the ISO to 800. I rarely go above ISO 400 so I wasn’t happy about it, but a fast shutter speed was necessary to minimize movement in the flowers. (Technical data: Nikon D800E with a 14-24mm lens extended to 19mm; Exposure 1/800th sec. @ f/16, ISO 800)
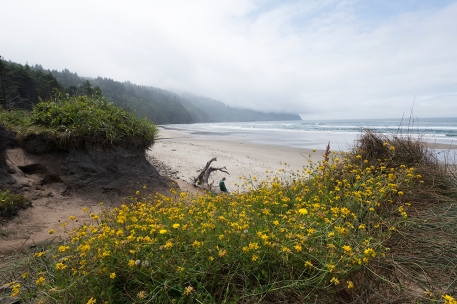
The original image is shown as the RAW file came from the camera, before any changes were made in Adobe Camera Raw (ACR).
Original Image as unprocessed RAW file
The first steps were taken in ACR, and the adjustments made were as follows:
Highlights: Changed to -93, ta severe reduction to cut back the brightness of the scene;
Shadows: Changed to + 15 a modest boost to open up the shadows in the foreground;
Clarity: Changed to +20 (not as much as I usually employ, but this seemed to be enough);
Vibrance: Changed to +23 (to give a small boost to the yellow flowers and blue sky).
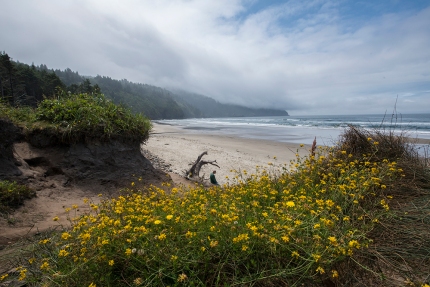
All other settings were unchanged. The result was then opened in Photoshop CC and looked like this:
Image after changes made in Adobe Camera Raw
A minor crop removed some of the sand in the immediate foreground and on the right side. This increased the importance of the yellow flowers in the foreground.
Next, an adjustment layer (hue/saturation) was applied to the overall scene. The blend mode was “saturation” and the amount was increased to +14. This is a relatively small change, but it made in nice difference in the sky and the yellow flowers, both of which seemed a little too flat.
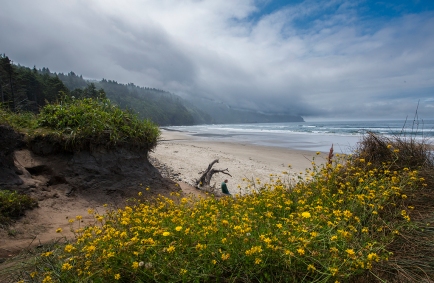
Finally, the sky and clouds were selected and a curves adjustment layer (blend mode=luminosity) was applied to darken those portions and bring back the dramatic appearance that was there that day. The final result is shown below.
Final Image
Observant readers may notice the man seated on the driftwood log in the center of the image: he is very hard to see in this small size. I was somewhat ambivalent about whether he should be left in. I finally chose to leave him there because he provides a sense of scale. In addition, I was going for representing what I saw that day, which is also an argument for his presence. I’m not in love with his posture, however.


Such a similar images we’ve submitted this week Robin; what a coincidence! I must underline the excellent job you did with this image. First of all, for the beautiful image you composed when clicking, but also for the awesome result of your edition technique; especially, on the sky section. And finally, though leaving the man or removing it from the scene might seem a minor detail, I consider it a very important decision to make because it would change radically the perception or feeling of the photo. Without the human figure, this would be just a beautiful landscape picture but, the presence of that solitary person, in that kind of tired posture, turns it into a much more thought provoking image; the message is totally different. So, I definitely celebrate your choice; very well done!
LikeLiked by 1 person
Thanks, Jaime. It is interesting that we chose similar images this week. I was impressed how you used just a few subtle changes to unleash the power of the image. And your point about the man’s posture in my image is well taken. One wonders what he might be thinking or what his story might be.
LikeLike
Great edit Robin, I the colours feel so much bolder in the final image.
LikeLike
Pingback: After-Before Friday Week 8 | Visual Venturing
Robin, beautiful image! Best picnic lunch spot ever! As I just drove up the Pacific Coast Highway yesterday, this scene really resonates with me 🙂
As always, I enjoy reading about your process. I’m interested to learn what you mean by the phrase: “…the normal hyper focal technique of using an aperture of f/16 …” Hyperfocal distance is something I’ve been trying to understand.
I absolutely agree with your decision to leave the man in the scene – most especially because of the sense of scale he provides, but also because it allows the imagination to wander, wondering, as you and Jaime mention, what his story might be. I keep going back and looking at the image, because it is so compelling.
Thanks for once again participating in ABFriday!
LikeLike
Thanks, Stacy: So far, it’s unanimous that the man should be left in the image. Hyperfocal distance refers to a term in optics that can lead to lengthy discussions and reference charts with lots of numbers. Oversimplified, it is a way to maximize the depth of field (DOF)in an exposure. Generally, the DOF is greater with wider angle lenses closed down to smaller apertures. In addition, selecting the proper focus point helps to maximize the effect. I first learned of it from Galen Rowell, at one of his workshops back in 2001.
LikeLike
Thanks for the explanation, Robin. It’s selecting the proper focus point that alludes me. I don’t have a wide angle lens – I have a Nikor 30-200mm zoom – and typically focus 1/3 of the way into the scene when stopped down. I am digesting Bryan Peterson’s “Understanding Exposure” and he speaks of presetting the focus via the distance settings on his lens. Never used that ring on my lens, but seems its relevant to DOF…. Perhaps I should look into a workshop 😉
LikeLike
Hi, Stacy: You can use your 30-200 for this; just try to keep the extension down close to the 30mm side. Bryan Peterson’s approach can work, and often one is given a table that has the data on how much will be in focus depending on aperture and lens extension. But I find that those kind of procedures tend to slow me down. So my approach would probably disturb those who are looking for precision, maximizing the effect, etc. My approach is to set the lens at a wide setting (e.g., 24-35mm) that makes sense for the scene, push the aperture to f/16, select an appropriate shutter speed/ISO combination, and identify an approximate point in the shot where the 1/3 point has the amount of foreground you need to be in focus, focus on that point in the viewfinder, and shoot. All too often, the scene is changing quickly (light, clouds, the man on the log gets up and walks away) and I don’t want to miss a shot because I was consulting a data chart. It seems to work, at least for me. But as you know from Lightroom and Photoshop, there are multiple ways to skin a cat so the best tactic is to pick a method that works for you.
LikeLike
Robin, thanks for taking the time to spell out your procedure. I truly appreciate it!
LikeLike
Happy to do so, Stacy. Almost everything I’ve learned came from others telling me what they learned. I’m happy to to pass it on.
LikeLike
Hi Robin, it can be amazing who subtle little changes in Camera Raw and photoshop will give an image impact. I agree with Jaime about the man presence, and I was struck how his posture seemed to mirror the bend in the tree!
LikeLike
Thanks for the feedback, Janice. I appreciate the comments. Yes, I was also struck with the repeating curve of his posture and the tree branch.
LikeLike
this is nice how minor improvement can do such good to a picture.
LikeLike
Thanks very much. You’re right; sometimes we are tempted by all those wonderful computer tools to keep changing the image. Often, the secret is knowing when to stop;-) I appreciate your stopping by and commenting.
LikeLike