Welcome to AfterBefore Friday, the Forum hosted by Stacy Fischer which allows participants to illustrate that the work isn’t done when the shutter clicks. My submission is described below, but be sure to check out ABFriday Headquarters because in addition to this week’s submissions, you will see the unveiling of next Month’s candidate image for the OnePhoto Focus Event.
After Before
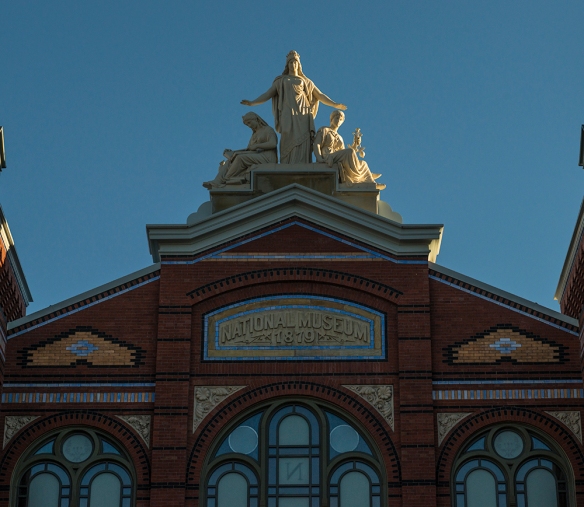
I’ve been told that using the histogram on your digital camera simplifies the work in post-processing, it’s just a matter of trusting the graph instead of your eyes. It seems this is true. For example, I found a scene this week that is not particularly noteworthy but it provided an opportunity to work on a combination of some troublesome exposure issues—a bright blue sky, a white sculpture partially illuminated by a bright sun, and a dark brick building in shadow. The subject is the Smithsonian’s recently renovated (but empty) Arts and Industries Building.
I don’t have an easy way to display the camera’s information screen here, but those who want to know more can easily do a quick search on the terms “using the camera’s histogram.” In brief, I wanted to ensure there was detail in the shadows while not blowing out the sky or the white sculpture. After some trial and error I settled on an exposure 1.3 stops darker than what the camera’s meter was telling me. The image preview on the LCD looked really dark but the histogram was saying “don’t worry, the detail is all there.” The Before image below is what came out of the camera.
Before Image
Following normal workflow sequences, I made a few changes in Adobe Camera Raw, setting the white and black points, setting the Shadows to +100 (to open up the darker areas), and setting the clarity and vibrance to the usual values of +30. The result is shown below
After Adobe Camera RAW Adjustments
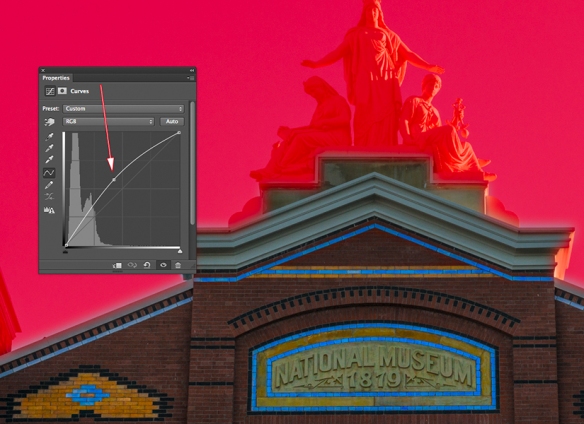
Moving into Photoshop CC, only three more small adjustments were needed. The two bits of roof on the left and right edges were removed with the clone tool. Second, I selected the brick building and used a Curves Adjustment Layer (Blend Mode=Normal) to make it brighter (see white arrow). The red area in the image below illustrates the mask blocking the effects of the adjustment to the sign.
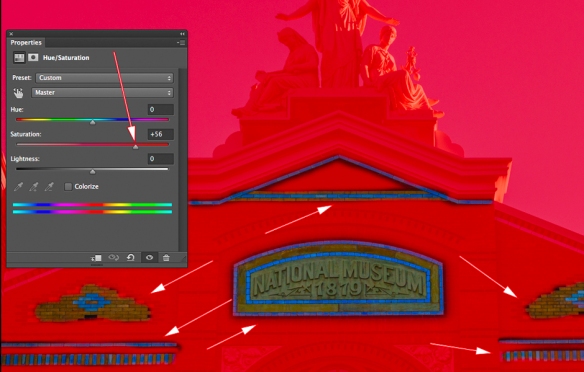
Third, I selected the decorative tiles including the sign and used a Hue/Saturation Adjustment Layer to enhance their colors (see arrows). The red area in the image below illustrates the mask blocking the effects of the adjustment.
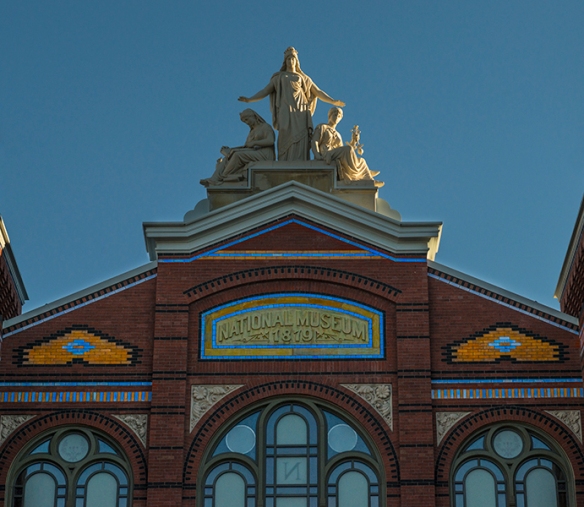
And that was it. The brick front of the building could have easily been lightened even more but the tones were an accurate representation of the late afternoon shadows. The final image is shown below.
Be sure to see all of the other submissions at Stacy’s Visual Venturing Blog here.


well done!
Sent from my iPad
>
LikeLike
Thanks! Now that they have done the renovation, I thought it was time to do some work with that building. It has a lot of interesting details.
LikeLike
Always enjoy seeing your “before” and “after” photos. I’m still doing baby steps…
LikeLiked by 1 person
Thanks very much, I appreciate the comments. I also like seeing what you are finding in the DC area.
LikeLike
Robin, what a great job adding detail back into the building. Into the entire image, for that matter.
LikeLike
Thanks, Emilio. It’s the first time I took a photo specifically for the ABFriday Forum. The deep shadow (due to the late hour and the sun’s angle behind the building) looked like an interesting problem to take on.
LikeLike
Nice job Robin! you have given the image a lovely warm glow. The statues on the top look beautiful with the afternoon sun catching them, well captured!
LikeLiked by 1 person
Thanks very much, Katie. I appreciate the comments. I was planning to check all the others today but things got away from me. Hopefully, things will be less hectic tomorrow.
LikeLiked by 1 person
The selective brightening with curves is what really brings the image together. Really nice editing Robyn.
LikeLike
Robin, what a great topic for your post. In conditions such as the one you shot this in, I always have the mantra in my head “expose for the highlights” (though I’ve learned that opening up the shadows can lead to extra noise – yet another issue to be dealt with). Trusting the histogram is really the way to go, especially when you can’t get a clear view of your LCD screen because of the light you’re in. Great before and after!
LikeLiked by 1 person
Thanks, Stacy, glad you liked it. Relying on the histogram really proved itself to me on the recent trip to Antarctica. I had no previous experience in that environment, plus the light level was low and the need for a fast shutter was high. All this combined to force aperture/shutter/ISO combinations that were very discomforting. If I hadn’t had that little graph on the back of the camera, the trip most likely would have been a bust photographically.
LikeLike
What a difference! Such a common problem.
LikeLike
Thanks very much!
LikeLike
Another useful thing I learned from you. It always troubles me how different images look on my camera display and PC monitor. When I think I captured a nice image, it turns out not that nice once I see it on a large monitor.
LikeLike
Thanks! Glad it helped. Several things are at play here and I’ve been snagged by many of them as you describe. The camera has low-end display compared to a computer monitor and the ambient light can really make it hard to know what is really going on. This is especially true in the evening; I’ve been sadly tricked by what the camera screen was telling me. Another factor is that even when you are shooting RAW, the screen shows a JPEG rendition. Actually, that is probably just as well, because it gives you a rough idea of what the finished image could look like.
LikeLike