 Moon over Abandoned Pilings, Marquette, Wisconsin
Recently, I was asked by a local camera club to give a presentation on “Low Light Photography” and I thought perhaps an abbreviated version might be worthwhile on my blog.
Because the majority of my photography involves landscape scenes and urban architecture, I decided to concentrate on that area, even though low light scenarios can occur in many other situations such as when you are indoors and cannot use a flash.
 Night at the Museum, NASA Shuttle Enterprise in the Udvar-Hazy Center
The above image is not typical of what I do, but when an opportunity arises to get inside a major museum after closing, you don’t pass it up. Especially if it’s authorized.
For me, however, twilight is a classic example of how a low light situation can present opportunities for especially dramatic images that are not possible during daylight hours.
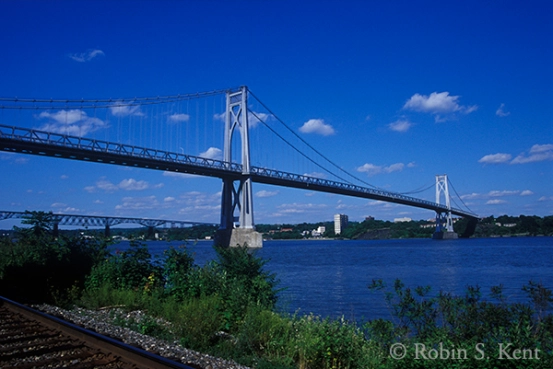 Mid-Hudson Bridge, Afternoon Scouting Image
 Mid-Hudson Bridge at Dawn, (the next morning)
We all know we that twilight is a relatively short period of time after the sun has gone below the horizon. Even though the sun has disappeared, scattered sunlight from the atmosphere continues to provide illumination.
 Transition from Day to Night
But there are three different categories of twilight, based on how far the sun is below the horizon as shown in the chart above. Understanding those three categories is important because the quality of the light and therefore one’s photograph changes significantly depending on how long it’s been since sunset. It also depends on whether you are pointing your camera away from the location of the sunset/sunrise or toward it.
So let’s look at some examples.
 WW I Memorial at Twilight, Washington, DC
(Tech Data: 19 Minutes after Sunset, Civil Twilight, looking Northwest 1.6 sec., @ f/16, ISO 400, Nikon D800E)
Here, during the first phase of twilight, there is still a fair amount of ambient light to show detail in the subject and the sky is taking on the classic blue of the “Magic Hour.”
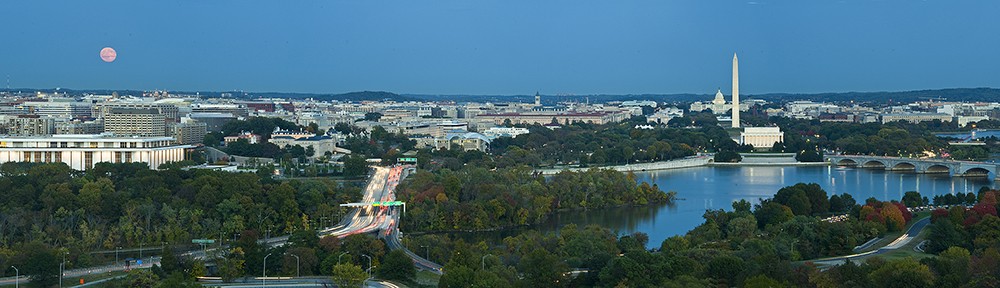
 Kennedy Center at Twilight, Washington, DC
(Tech Data: 40 Minutes after Sunset, beginning of nautical twilight, looking Southeast, 1.3 sec @ f/5.6, ISO 400, Nikon D800E)
Here, the sky is much darker, in part because it is a bit later than the previous image and also because the camera is pointing away from the western horizon. The image also demonstrates another technique that can porduce a more dramatic look at night: the use of a reflection in a body of water, be it river, pond, or rain puddle.
 WWW II and Washington Monument at Night
(Tech Data: 51 Minutes after Sunset, near the end of nautical twilight, looking East, 6 sec. @ f/16, ISO 400, Nikon D800E)
 County Fair with Moon, Madison, Wisconsin
(Tech Data: 1 hour 51 minutes after Sunset, after end of Astronomical Twilight, looking generally East, 5 sec. @ f/16, ISO 100, Nikon D800E)
The glare (a typical problem for night shooting) was managed by using a small aperture to get the star effect which is more attractive than a blown-out spotlight or street lamp. It’s also good idea to use the lens shade when shooting cityscapes at night, to minimize glare from bright lights just outside the composition .
There are many possible subjects for night-time shooting, including cityscapes, landscapes, a staged scenario, and astronomical phenomena. We’ll go into that in Part 2 of this series.
In the meantime, I would be interested in comments from readers about low light situations you have encountered and how you resolved them. I expect to be speaking on this subject again and it would be great to bring in some additional ideas .
Until, then…Keep Shooting

Great post Robin! Michele
LikeLiked by 1 person
Thanks, Michele!
LikeLike
My prayer was answered! Thanks, Robin. I haven’t build up the courage to shoot at night yet; I don’t even like to drive at night. But I love seeing night photos.
Are you shooting in manual mode? Always low ISO? Why not ISO 2000, since nowadays higher ISO doesn’t generate as much noise as before. Is it possible to define time for each twilight? For example, after sunset we have 40 minutes of Civil twilight, and after that we have xx minutes of next twilight… etc. Is blue hour include all three twilight or only the first?
I can save this post to my PC, right? Would you video tape your talk and publish on YouTube?
Thanks. Have a wonderful day.
LikeLiked by 1 person
Thanks, Helen: Thanks for your kind comments and great questions. Feel free to save this on your PC, no problem. I doubt I’ll do a Video, however. That is beyond my technical capability (plus I don’t have the necessary gear, I think). Anyway, to answer the technical questions, I generally shoot Aperture Priority. With landscape photography, I usually worry about depth of field so I normally pick small apertures. I know that high ISO is pretty impressive these days; I recently took a phootgraph at night at ISO 10,000 when I literally could not see the subject. But there was a reasonable image, noisy for sure, but pretty much everything was visible. Low ISO is my preference, however, because my images need to be sharp enough to make very large prints (up to 6 feet wide). In today’s environment of High Def TV, 4K digital video, etc. clients would not be satisfied with an image on their wall that looked “soft.” So I always have to use a tripod. As for the length of twilight, there is a specific definition for each phase. For example, here in DC this evening, civil twilight lasted 30 minutes exactly. Nautical twilight lasted 33 minutes and Astronomical twilight lasted 32 minutes. Usually the “Blue Hour” starts about 5 or 6 mintes after sunset and begins to get darker toward the end of civil twilight. But the blue is much darker when you point your camera away from the sun’s last visible position. Check the differences in the images in the post regarding the direction of the camera. (Only the Mid-Hudson Bridge image was taken in the morning and the camera was pointing east.) As a general rule, be on site shortly before sunset, figure out your composition, and start shooting a little before you think it’s perfect (say about 5 minutes after sunset) and keep shooting (maybe once every 30 seconds) until a few minutes past the time you think it’s perfect. Bear in mind that as it gets darker, the display on the camera may be misleading you as to how bright the image will be. Many photographers lower the brightness of their display monitor when shooting at night. It takes some proactice to get a sense of what kind of results you will get. SO don’t be discouraged if your first attempts are not as great as you hoped. Best of luck!
LikeLiked by 2 people
Thank you, Robin. Reading your reply brought tears to my eyes. I like asking questions, but I don’t expect answers because I know how busy everybody is. Thank you so much! You are very kind!
I think I will practice in my backyard shooting 5 minutes after sunset and keep shooting. Not much in my backyard, really 😉 But I just want to make sure I can get some clear photos. Ha.
Thanks again. If you’re giving a workshop, please let me know. I am not sure I will be able to attend (I have a boss at home 😉 , but I certainly would do my best to come. Online workshop will work better… 😉
Have a great evening. I am going to read your reply a couple more times and keep it with your post.
LikeLiked by 1 person
Impressive set of pictures and post itself.
LikeLiked by 1 person
Thanks, ALexander. Always great to hear from you.
LikeLiked by 1 person
I am always amazed at how much light there is even long after sunset. Great post, Robin. You could also cover night skies?
LikeLiked by 1 person
Thanks, Chris. Yes, I plan to include some words about the moon, star trails, and the Milky Way in the next post or the tird one depending on how long the next one is. You must see a lot of great night skies on the “Take it Easy,” but I imagine long exposures are tough when sailing.
LikeLiked by 1 person
Yes I miss long exposures and the night skies at sea are amazing. But it is always a rigmoral to dinghy ashore in the dark for a Milky Way shoot, so it does not really happen!
LikeLiked by 1 person
Yes, I can imagine! Walking around in the dark is one thing, but rowing a dinghy at night could be a bit scary, I would think. But I imagine you are often located in a “dark sky” area so you have frequent opportunities to see these things by just looking up.
LikeLike
This is cool stuff!
LikeLiked by 1 person
Thanks! I appreciate the feedback.
LikeLike
Very interesting to learn more about the science behind these beautiful photos!
LikeLiked by 1 person
Thank you. I’m glad you liked the post.
LikeLike