Low Light Photography (Part 3)


 Low Light Moon 1503-36
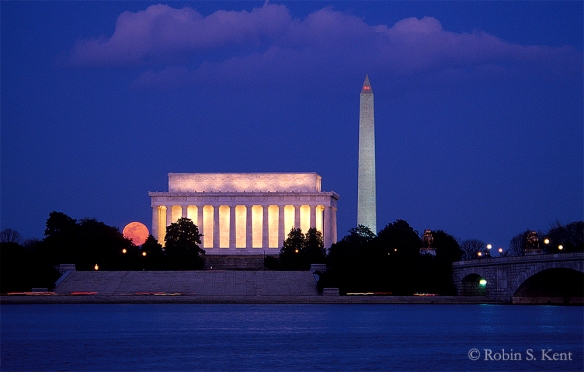
Moonrise, Lincoln Memorial

 Photographing the moon, stars, and the Milky Way brings a different set of challenges, most often in planning where to be and when.  Happily, this is no longer as hard as it used to be,  because there are various apps such as The Photographer’s Ephemeris (TPE) or PhotoPils that enable you to predict where the moon and other astronomical bodies will be at any given time and location.

The picture above was taken in 2001 when such things did not exist. You needed a compass and a chart with the azimuth of the moonrise.  On March 9th, the moonrise was at 6:19 PM, 10 minutes after sunset.   

Low Light D-09-09-05-51_52_53 (Moonrise, Washington) 
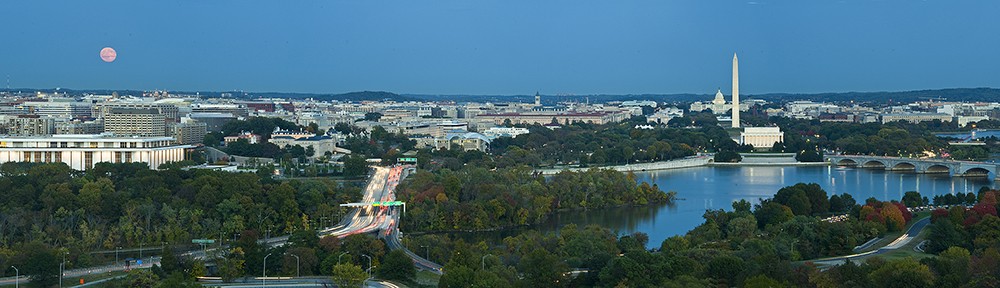
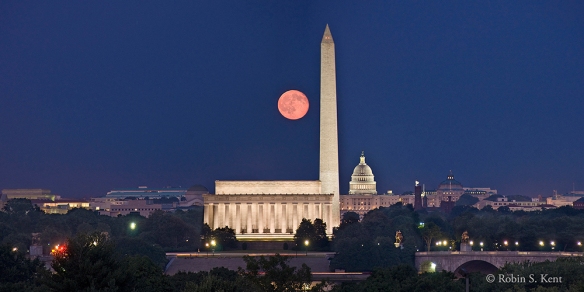
Moonrise over Washington DC 

(Tech: Nikon D200 with 18-200mm f/3.5-5.6 lens, @ 200mm, exp:  1.8 sec. @ f/5.6, ISO 200; 3 vertical images, photomerged)

Capturing a full moon rising over Washington, DC from this location near the Netherlands Carillon is a much desired goal of many local photographers.  These days, when the alignment is expected to be good, you will find as many as 100 photographers at this location poised for the opportunity.

The image above, however, was photographed on Sept 5, 2009, the night after the full moon, and also back before TPE and other apps were generally available.  There were less than a half dozen photographers up there that night.  The next chance for an almost identical shot at this location will be on October 5, 2019.

Low Light D-11-05-28-8051_58 Iwo Jima 
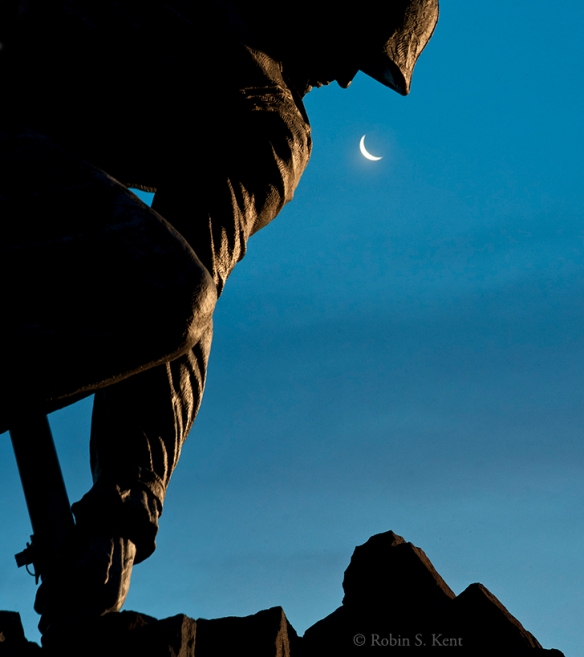
Iwo Jima and Crescent Moon

The moon doesn’t necessarily have to be full to find an interesting angle, but it might mean that you have to get up early in the morning.  This was taken at about 5:20 AM, during civil twilight when the waning moon was about 19% full.

(Tech:  Nikon D200, 18-200 f/3.5-5.6 lens at 200mm; exp 0.6 sec. @ f/20, ISO 2500)

Low Light D-14-10-08-2014 EclipseLunar Eclipse Multiple Exposure

(Tech: October 8, 2014, Total of 18 Exposures over a 64 minute period, exposures varied depending on brightness of moon)

A lunar eclipse is a relatively rare event, but it can be photographed in a variety of ways depending on the timing and track of the moon across the sky.  In this case of an early morning eclipse, I tried an application of the stacking technique I learned in a Michael Frye workshop for shooting star trails (discussed below).  The next total eclipse in Washington, DC will be on the night of 20-21 January 2019.  Information of the date and locations of upcoming eclipses anywhere can be found here.

Low Light D-14-08-23-3525 (Gaylor Lake)Milky Way over Gaylor Lake, Yosemite National Park

When photographing Stars, one has to get away from the light pollution of city lights.  Dark skies, such as Yosemite National Park, are increasingly rare.  One place to find them is at the Dark Sky Association website.

This kind of photography involves a number of considerations.  According to Michael Frye: “Capturing pinpoint stars requires relatively short exposures, otherwise the stars become streaks instead of points. You can get away with exposure times as long as 30 seconds with wide-angle lenses.  To gather enough light to show faint stars and the Milky Way with such short exposures, you need both a wide aperture and a high ISO. The wider the aperture and the higher the ISO, the more stars will appear in your photograph. But you might not want to use the widest aperture on your lens, because all lenses are sharper when stopped down a bit. Or if you have something in the foreground you may need to stop down slightly to get sufficient depth of field.  To start with, try 15 to 30 seconds at f/2.8, with the ISO at 6400. If that doesn’t show enough stars, try a wider aperture or higher ISO.”

The Milky Way is not visible in the Northern Hemisphere during January and February.  For a comprehensive discussion of when and where to photograph it, check this link.


Low Light (Star Trails) D-13-09-08-3496Star Trails, Sonora Pass, California

The technique for capturing star trails is similar to shooting the Milky Way in that a fast (f/2.8 or better) wide angle lens (24 mm or wider)are necessary.  But instead of one relatively short exposure, this kind of image requires a series of long exposures at a relatively low ISO.  The above image involved 30 separate exposures, each four minutes long with a 1 second interval between each one.  The aperure was f/5.6 and the ISO was 400.  An intervalometer was attached to the camera to manage the sequence of shots.

Then, during postprocessing, you can load all the images into photoshop as layers.  You then click off the visibility (the little eyeball on the left of each layer) of all layers except the bottom layer.  Then Cchange the blend mode on all layers to “lighten” and the star trails will appear.  This action blends the layers together keeping only the lightest areas of the photo.  Merge the image as a single layer.

I hope these three posts on low light photography are of some use to readers interested in taking on the low light challenge.  For now, however, I will be taking a break from my blog for about 6 weeks as I get ready for an upcoming trip to the monarch butterfly preserves in the Sierra Madre Montains of central Mexico.  You can get an advanced peek at what I hope to see there by checking out my post from 2016.

You cn also check out my Instagram feed (@photographybykent) which will have occasional posts over the next several weeks.  In the meantime,

Keep Shooting……….


Low Light Photography (Part 2)


As mentioned in last week’s post, possible subjects for night-time shooting include cityscapes, landscapes, a staged scenario, and astronomical phenomena.  In the case of cityscapes, one does not have to live in, or travel to, well-known cities such as Washington, DC, New York City, or Paris.

Low Light (Hartford) D-14-12-04-5599_606Hartford at Twilight

(Tech: Nikon D800E with 24-70mm f/.28 lens @ 50mm, 3 sec. @ f/16, ISO 400, photomerge)

This was taken during the Nautical Twilight phase, but by looking west, one can still see plenty of light in the sky.  The location was chosen because there was good illumination from city lights over most of the scene and the Connecticut River provided  a nice reflection of the city lights.  Using water to reflect lights can be a very effective technique at night.  As before, the glare from the brighter lights was managed by using a small aperture to produce a star effect.

Low Light (Pittsburgh) D-13-08-17Pittsburgh at Night

(Tech: Nikon D800E with 70-200mm f/2.8 lens @70mm, 1/6th sec. @ f/2.8, ISO 1600)

From this location (an overlook in the 1400 block of Grandview Avenue), the city of Pittsburgh provides a dramatic night scene with plenty of illumination.  However, the moving ferry in the river required a relatively short exposure, forcing a setting at a wide aperture and high ISO.

Tactics for Adding Interest

Aside from looking for potential reflections, one can also look for illuminated fountains, use time exposures to  incorporate traffic flow, or take advantage of a special event such as temporary art installations or fireworks.  The city of Washington, DC has many fountains although most are shut down for the winter.

Low Light (WW II Mem) D-13-06-01-9189_209WW II Memorial at Twilight

(Tech: Nikon D800E with 24-70mm f/.28 lens @ 24mm, 8 sec. @ f/14, ISO 400, photomerge)

The primary reason for using a photomerge in this case was to “remove” the tourists in the scene.  About 17 separate exposures were made, each of a small section of the scene that did not have anyone in it at that moment.  Depending on the situation, there are easier ways to do this in Photoshop, such as the Image Stacking Mode or the Scripts-Statistics  process.  But those techniques have difficulty with any moving object, such as a flag or moving water, that appears in every image.                                                                                   Low Light (Bartholdi)D-11-09-16-2649  Bartholdi Fountain at Twilight

(Tech: Nikon D800E, 24-70mm f/2.8 lens @ 56mm; 10 sec. @ f/16, ISO 400)

 This fountain, dating back to 1876, was created by August Bartholdi, a French artist who is better known for the Statue of Liberty.  It is located in Bartholdi Park across Independence Avenue from the US Botanic Garden.

Fountains can be found in most cities around the world; Rome and Paris (see image below) are famous for their fountains,  but Kansas City reportedly is second only to Rome in the number of municipal fountains.

Low Light (Paris Fountain) brighter D-14-06-04-8826_27Place Concorde at Twilight, Paris

(Tech: Nikon D800E, 24-70mm f/2.8 lens @ 24mm; 5 sec. @ f/16, ISO 200)


Moving traffic can pose a problem for night photographers, but, by using a long exposure to create trace lines, what might be a flaw becomes a strength.

 Low Light (Kutz Bridge) D-11-03-13-4100Washington Monument and Kutz Bridge

(Tech: Nikon D800E, 24-70mm f/2.8 lens @ 38mm; 8 sec. @ f/16, ISO 200)

When shooting at street level, the brightness of oncoming headlights can still be a problem, even with a long exposure.  Here the traffic was going away from the camera so only the taillights and the blue warning lights from the police car were visible.

This technique does not have to be restricted to street vehicles.  For locations near an airport, aircraft landings and take-offs can also be included as shown in the next two images.

Low Light (Final Approach) D-10-03-20-050Final Approach Over Key Bridge

(Tech: Nikon D200, 18-200 f/3.5-5.6 lens @ 42mm; 30 sec. @ f/16, ISO 100)

There are several locations where you can capture aircraft landing at National Airport.  This was taken on the river’s edge about 200 feet northwest of the Thompson Boat Center.

Low Light (Kennedy Center) D-17-11-29-0794Kennedy Center at Night

(Tech: Nikon D850, 24-70 f/2.8 lens @ 70mm; 20sec. @ f/18, ISO 100)

Special event illuminations such as the recent display by the Kennedy Center can provide unique opportunities because they usually only last for a short time.  This image combines several of the tactics discussed here: a special illumination, trace lights from vehicle traffic and aircraft, and using water to add reflections.

The next and final post in this series will cover astronomical phenomena, photographing the moon, stars, and the Milky Way.

In the meantime, Keep Shooting…………..


Low Light Photography (Part 1)

Low Light (Pilings) D-07-08-25-0028Moon over Abandoned Pilings, Marquette, Wisconsin

Recently, I was asked by a local camera club to give a presentation on “Low Light Photography” and I thought perhaps an abbreviated version might be worthwhile on my blog.

Because the majority of my photography involves landscape scenes and urban architecture, I decided to concentrate on that area, even though low light scenarios can occur in many other situations such as when you are indoors and cannot use a flash.

Low Light (Shuttle) D-07-07-02-0057Night at the Museum, NASA Shuttle Enterprise in the Udvar-Hazy Center  

The above image is not typical of what I do, but when an opportunity arises to get inside a major museum after closing, you don’t pass it up.  Especially if it’s authorized.

For me, however, twilight is a classic example of how a low light situation can present opportunities for especially dramatic images that are not possible during daylight hours.

Low Light (Mid-Hudson 01) 2137-33
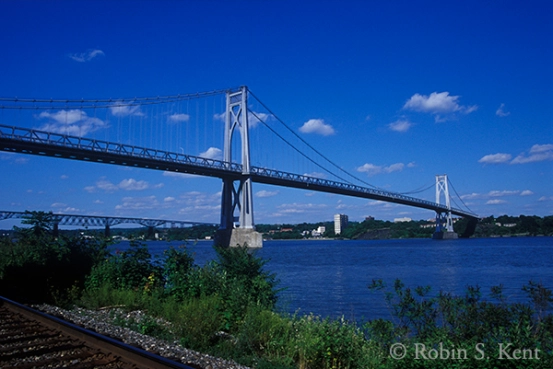
Mid-Hudson Bridge, Afternoon Scouting Image

Low Light (Mid-Hudson AM) 2138-02Mid-Hudson Bridge at Dawn, (the next morning)

We all know we that twilight is a relatively short period of time after the sun has gone below the horizon.  Even though the sun has disappeared,  scattered sunlight from the atmosphere continues to provide illumination.

Low Light GraphicTransition from Day to Night

But there are three different categories of twilight, based on how far the sun is below the horizon as shown in the chart above.  Understanding those three categories is important because the quality of the light and therefore one’s photograph changes significantly depending on how long it’s been since sunset. It also depends on whether you are pointing your camera away from the location of the sunset/sunrise or toward it.

So let’s look at some examples.

Low Light (WW I MEM) D-14-06-28-1750 WW I Memorial at Twilight, Washington, DC

(Tech Data: 19 Minutes after Sunset, Civil Twilight, looking Northwest 1.6 sec., @ f/16, ISO 400, Nikon D800E)

Here, during the first phase of twilight, there is still a fair amount of ambient light to show detail in the subject and the sky is taking on the classic blue of the “Magic Hour.”


Low Light (Kennedy Center) D-13-03-17-6064_70Kennedy Center at Twilight, Washington, DC

(Tech Data:  40 Minutes after Sunset, beginning of nautical twilight, looking Southeast, 1.3 sec @ f/5.6, ISO 400, Nikon D800E)

Here, the sky is much darker, in part because it is a bit later than the previous image and also because the camera is pointing away from the western horizon.  The image also demonstrates another technique that can porduce a more dramatic look at night: the use of a reflection in a body of water, be it river, pond, or rain puddle.

Low Light (WW II Mem) D-11-04-30 7062_63 WWW II and Washington Monument at Night

  (Tech Data: 51 Minutes after Sunset, near the end of nautical twilight, looking East, 6 sec. @ f/16, ISO 400, Nikon D800E)

 Low Light (Ferris Wheel) D-13-07-19-044County Fair with Moon, Madison, Wisconsin

(Tech Data: 1 hour 51 minutes after Sunset, after end of Astronomical Twilight, looking generally East, 5 sec. @ f/16, ISO 100, Nikon D800E)

The glare (a typical problem for night shooting) was managed by using a small aperture to get the star effect which is more attractive than a blown-out spotlight or street lamp. It’s also good idea to use the lens shade when shooting cityscapes at night, to minimize glare from bright lights just outside the composition .

There are many possible subjects for night-time shooting, including cityscapes, landscapes, a staged scenario, and astronomical phenomena.  We’ll go into that in Part 2 of this series.

In the meantime, I would be interested in comments from readers about low light situations you have encountered and how you resolved them.  I expect to be speaking on this subject again and it would be great to bring in some additional ideas .

Until, then…Keep Shooting


Moonrise

I know, I know.  I promised scenes from the Galapagos would be in my next post, but……

A week ago (March 12), there was a full moon, an event that happens every 29.5 days.  But for photographers in Washington, DC, it was a special night because the moon would rise in a location on the horizon that was pretty close to perfect for the so-called “Holy Grail” shot.  It happens, on average, every one or two years.

Full Moon March 2017

Moonrise over Washington, D.C., March 12, 2017

(Technical: Nikon D810 with 70-200mm f/2.8 lens extended to 200mm on tripod;                Exposure: 1.6 sec @ f/11, ISO 400; taken )

There is a spot in Arlington, Virginia where one has an excellent view of the city of Washington with a compositionally sweet alignment of the Lincoln Memorial, Washington Monument, and the U.S. Capitol.  The location is the base of the Netherlands Carillon, just to the south of the Iwo Jima Memorial.

Before the advent of the smart phone/tablet, anticipating this event was not easy, requiring a compass and access to some publicly available software on the website of the U.S. Naval Observatory.  But now, with the availability of numerous apps, such as The Photographer’s Ephemeris (TPE) or Photo Pils, anyone can figure it out. For example, on this night, even with temperatures hovering around freezing, there were over 60 photographers there, each with at least one tripod and a big lens.

Other than the cold weather, conditions looked pretty good on this evening.  The sky was clear and the moon would rise at 86.0 degrees azimuth on the horizon and 13 minutes after sunset.  That was a bit further south than ideal, and a bit later than desired relative to the sunset. Nevertheless, it would be the best opportunity in 2017 with only one other chance (October 5) that will be in the ballpark.  However, in October, the blue twilight period (Civil Twilight) will end before the moon gets sufficiently elevated.

Moonrise D-17-03-12-9670

(Technical: Nikon D810 with 70-200mm f/2.8 lens extended to 200mm on tripod;                Exposure: 1.0 sec @ f/11, ISO 400; taken at 7:32 PM)

Although the official time of the moonrise was 7:27 PM, it would be a bit later before it would appear above the skyline.  It was first sighted by the group at about  7:29 and the image immediately above was taken about 90 seconds later.  By this time, the end of civil twilight is approaching and we would soon lose the classic blue color that is essential to this kind of image.


Moonrise D-17-03-12-9696

(Technical: Nikon D810 with 70-200mm f/2.8 lens extended to 200mm on tripod;                Exposure: 2.0 sec @ f/11, ISO 400; taken at 6:36 PM)

Furthermore, the combination of a very clear sky with the rapidly fading twilight would cause the moon to become extremely bright as it rose above the dimming effects of the ground haze.  The above image was taken at 6:36 PM, about 3 minutes before the end of civil twilight.    Already the moon is becoming increasingly bright and the excellent details on its surface have almost vanished.  Any images taken after this point would require increasingly heroic post-processing efforts.

So when you prepare for a moon shot, make sure you check more than the location.  The relationship in time between the sunset and moonrise and civil twilight can have a significant impact on your results.  If you are in a classic landscape situation where no artificial lighting typical of an urban scene is expected, you may want to evaluate the prospects on the night just before the actual full moon.  This is especially true where a mountain may be blocking the moon at the time of the “official” moonrise.


Next (and I promise): Scenes from the Galapagos Islands.


Giverny: Monet’s Gardens

My painter friends may chastise me for this skimpy report on a subject dear to their hearts, but time is fleeting and promises to do more sometime soon will have to suffice for now.

Although I have visited these gardens on two previous trips to France, I had not been here in June or July, which is the time that the water lilies bloom. It was our hope that they might be out this time, so off we went on Tuesday to see what might be in store this time.   It turned out that we were in luck.

I calculated in advance how best to minimize (at least in my photographs) the excessive crowds that almost certainly would be there. Here are three images that show the results and the several tricks that I used are listed afterwards. (I should confess that none of these maneuvers are surprisingly new, but might be helpful to photographers at least. I envy painters who, blessed with skills I can barely comprehend, merely leave out those pesky details.

Image

Approaching Storm, Monet’s Giveny Gardens

Image

Water Lilies, Monet’s Gradens

Image

Monet’s Garden, Giverny

 Here are my 4 techniques to minimizing the crowds at Giverny and similar places:

1. Pick a day when rain is forecast and likely, but the outlook should be for showers rather than a sustained deluge. The prospects for rain discourages some, but not all. Moreover, overcast skies contribute to higher quality images when photographing flowers.

2. Find a position that where plants (which you want) help block out many of the tourists (which you don’t want) as they pass through the scene, but also provides a good composition.

3. Break up the scene into a number of images using a longer lens, picking off sections that have few or no persons in the scene. Then use photomerge in the photo post processing software of your choice.

4. Move in close for a tightly framed image where those pesky people can’t trespass.

5. Still, there are some folks who will successfully thwart your best efforts in any number of images. Don’t curse them; Delete them! The clone tool and the Edit-> Fill-> Content Aware procedure are your best friends here.

It was a dark and Stormy Night…

Wind, clouds, and nightfall.  Not the usual descriptors for perfect photographic conditions, but in the right circumstances,   these conditions can produce dramatic images.  As suggested in my last post, the Navy and Merchant Marine Memorial seemed to have potential for nighttime photography.  And so, here are a few examples of my first attempts.

Image

Sunset plus 15 Minutes (Note Washington Monument under leading gull)

Continue reading

The Washington Monument: Opening Soon!

The Washington Monument is the iconic structure of the city of Washington DC and I have been photographing it since 1999 when I first got serious about photography.  Yet despite the numerous images I’ve made of it in the 15 years since then, I am somewhat embarrassed to say that I never made it to the top during that time.  But even though I do have a few excuses—such as an earthquake—it serves no purpose to bore you with a recitation of them.  Instead, I have seen the error of my ways and I fully intend to be up there as soon as possible when it re-opens next month.  Details about the re-opening are below, but first a few highlights from the past 15 years are in order, not necessarily in a chronological order.

Image

Continue reading