Close to Home


Since I’m on the road today, this post combines the monthly One Friday Focus, sponsored by Stacy Fischer’s Visual Venturing Blog and a short piece inspired by a conversation last week with a fellow photographer.  Meanwhile, I’m off on another short trip this weekend, hopefully to capture a few images of the Milky Way over the Atlantic Ocean.  So once again, this post will serve double duty.

Last week Kim, a fellow photographer in the Great Falls Studios organization, described her specialty as photographing wildlife in her backyard.  Later, while reflecting on what she had been saying, I realized that I had been doing only a little of this over the years.  Other than a major effort on a pair of nesting bluebirds, I have not really concentrated on seeking subject matter just outside my windows.  Her stories made me think that perhaps I should look harder.  But for now, I decided to search through my files for some images that I already had taken to see what did happen to catch my eye.  The one rule: they had to have been taken from a spot within 100 feet of my house.   So, for what it is worth, here they are:
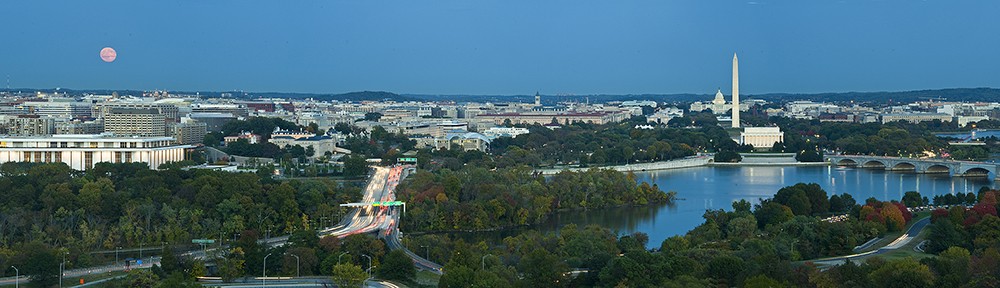
Kent June 2016 Solar Halo

Solar Halo

(Technical: Nikon D200 with 18-200mm f/3.5-5.6 lens at 18mm handheld; 1/1,000th sec. @ f/16, ISO 200)

Kent June 2016 Snow

Snow on Tree

(Technical: Nikon D200 with 18-200mm f/3.5-5.6 lens at 120mm handheld; 1/160th sec. @ f/6.3, ISO 200)

Kent June 2016 Magnolia

Magnolia

(Technical: Nikon D800E with 60mm f/2.8 Micro lens on tripod; 1/100th sec. @ f/8, ISO 400)

Heron D-16-05-21-5862

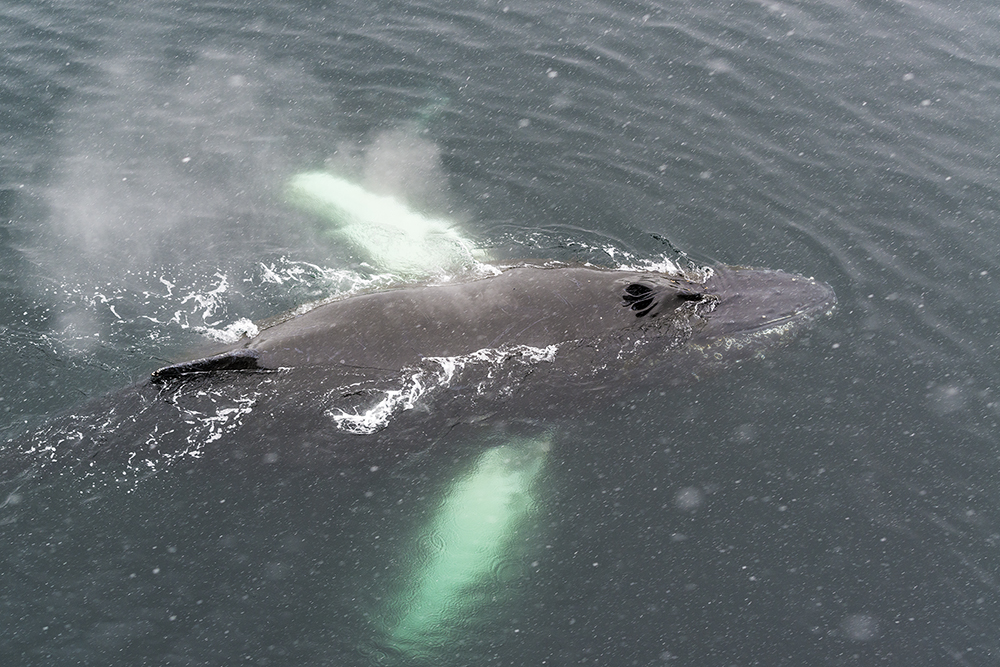
Blue Heron Taking Flight

(Technical: Nikon D810 with 24-70mm f/2.8 lens at 70mm on tripod; 1/500th sec. @ f/2.8, ISO 3200)

Kent June 2016 Butterfly

Tiger Swallowtail on Purple Coneflower

(Technical:  Nikon D800E with 24-70mm f/2.8 lens at 70mm handheld; 1/1250th sec. @ f/6.3, ISO 800)

Bluebird D-16-05-02-9754

Female Bluebird Bringing Dinner

(Technical: Nikon D800E with 50mm f/1.8 lens; 1/2000th sec. @ f/5.6, ISO 800)

This image was taken last month but is the same birdhouse used in my post a year ago.  I was planning a new approach this year.  Readers may recall that previously I had used a 200mm focal length lens on a camera inside the house and an off camera flash about six feet from the nest.  The flash was triggered by a wireless remote system (Pocket Wizard) but a single flash only provided a small amount of fill light.  This year, I planned to use Nikon’s wireless remote that would trip the camera’s shutter and place the camera about 10 feet from the nest.  I would be able to fire the shutter in continuous mode (not feasible with flash) while remaining inside the house. Unfortunately, I had only one day of shooting thanks to a sustained period of rainy weather.  But should the birds return next year, I may have better luck.

One Friday Focus

This month’s image was another interesting challenge, many thanks to David Croker for providing it.  As a reminder, the 1PF Challenge is sponsored by Stacy Fischer of Visual Venturing and anyone can participate.  Details can be found at  Visual Venturing .

David’s original RAW image is shown below.  It offers a variety of possibilities and started as usual  by going through some standard steps of image prep (setting B&W points, highlights, shadows, etc. in Adobe Camera Raw).  Following this,  I opened the file in Photoshop and tried several approaches such as a straight black and white print which looked very nice, but I finally decided to go on a more radical direction.

2016 06 1PF Original

This usually means a foray into the Filter Gallery, which is fast becoming my “go-to” place for this monthly event.  Needless to say, I do not possess a single plug-in app so my choices are somewhat restricted, comparatively speaking.

But I digress.  The tool I picked is the so-called Glowing Edges under the “Stylize” Tab.  Although I have used this one before, it behaves quite unpredictably (at least for me) so the results can be quite different in each case.  There are three adjustment sliders to control the effects and the final settings were: Edge Width: 2;  Edge Brightness: 17; and Smoothness: 8.  It was starting to look pretty decent, but the lovely blue sky in the upper portion was now a black void and desperately needed help.  Rather than just crop it out, I used the clone tool to copy sections of the lower clouds.  This, of course, created a new problem–the newly created clouds were not reflected in the water below.

The solution was to select the upper clouds, then copy them into a new layer.  I then used the Edit–>Transform–>Flip Vertical function to flip the layer and then I dragged it down to the bottom of the image.  An actual reflection should be softer and not as bright as the original object so I used the gaussian blur tool and a decrease in the opacity of the layer to create a look that matched the reflections that were already there.  The final image is shown below.

Robin Kent 2016 06 1PF Final Final

Thanks again to David for providing this month’s image and thanks also to Stacy for keeping this herd of cats heading in a generally productive direction.  Be sure and check out the other contributions at June One Photo Focus.  One again, there will be an amazing variety of interpretations.  In the meantime,


Keep Shooting….

London Scenes

April was a low profile month, blog-wise, but it’s been a little hectic in the real world, mostly involving travel.  However, a short trip to London and then to Oxford afforded some photo opportunities.

2016 April 02 copy

Approaching Storm, Westminister Bridge

Westminster Bridge was nearby and afforded an opportunity to capture some images in cloudy weather.

(Technical Data: Nikon D810 handheld with 24-70mm f/2.8 lens, extended to 32mm. 7 Exposures bracketed at ISO 400 and post- processed using the Photoshop HDR tool)

That evening, the twilight blue provided a nice counterpoint for the illuminated London Eye, a 443-foot-high Ferris wheel, erected in 1999.  The lines were long, our time was short, and so we opted for the ground-level view.  The building to the right is London County Hall which served as the city of London’s seat of government through most of the 20th century.  It now houses a variety of tourist attractions and an upscale hotel.

One of the problems in these evening shots was the fact that important elements of the scene were in motion (such as the Ferris wheel) which meant that a short exposure was necessary.

2016 April 06

London Eye at Night

(Technical Data: Nikon D810 on tripod with 24-70mm f/2.8 lens, extended to 24mm; Three exposures  1/15th sec. @ f/2.8, ISO 800; three images photomerged)

The Elizabeth Tower, better known as “Big Ben” was renamed in honor of Queen Elizabeth in 2012 to mark the occasion of her diamond jubilee.  Here the motion problem was the presence of numerous pedestrians walking by me.

2016 April 07

Elizabeth Tower (“Big Ben”) and Parliament Building

(Technical Data: Nikon D810 on tripod with 24-70mm f/2.8 lens, extended to 24mm; Eleven exposures  1/15th sec. @ f/6.3, ISO 800; eleven images photomerged)


2016 April 03A

Moon and Elizabeth Tower

Those who know me will not be surprised to see the moon included in a twilight shot.  Since the vantage point was in a traffic lane, I decided that setting up a tripod would be unwise.

(Technical Data: Nikon D810 handheld with 24-70mm f/2.8 lens, extended to 70mm; Exposure 1/8th sec. @ f/2.8, ISO 400; two images photomerged)

The Monument commemorating the Battle of Britain is relatively new, constructed in 2005.   It honors the heroic World War II air campaign during the summer and fall of 1940 that prevented the German Luftwaffe from gaining air superiority, making a land invasion impossible.   It was the first defeat for the Germans and marked a turning point in the war.  It is located on the Victoria Embankment a short walk from the Westminster Bridge.

2016 April 04

Battle of Britain Monument at Night

Again, the movement of the London Eye (red semi-circle in the background) required a fast shutter speed.

(Technical Data: Nikon D810 on tripod with 24-70mm f/2.8 lens, extended to 24mm. Exposure: 1/50th secs. @ f/2.8, ISO 3200)

 Getting up before dawn is far more difficult when your body clock believes it is 1:00 AM, but the plan for the next morning was driven by visions of a rising sun striking the Parliament building across the bridge from our hotel.  As the image below shows, however, Mother Nature had other plans that day.

2016 April 05

Early Morning Rain, Westminister Bridge

(Technical Data: Nikon D810 on tripod with 24-70mm f/2.8 lens, extended to 45mm. Exposure: 2 secs. @ f/16, ISO 200)

So, before my camera got too soaked, I headed back for breakfast and a taxi ride to the train station.

Keep Shooting…..

Hidden Gems: The Christmas Angel

Knowing where to be and when to be there is often the key to a special image.  Most of the time the “when” is hard to know in advance.  But one opportunity that occurs like clockwork every year is the phenomenon known as “The Christmas Angel” at the National Cathedral in Washington, DC.

At the back of the Cathedral (opposite end from the entrance, known as the apse), high on a wall, there is a row of statues of angels spaced at regular intervals.  The statues are not particularly remarkable because they are in the shadows and one would not normally notice them.  But there is one statue that becomes a major attraction for a few minutes each day in the months of November and December.  A stained glass window high on the opposite wall is perfectly located to allow a shaft of light strike the back wall of the nave at midmorning.

Natl Cathedral D-15-11-20-0047

Photographed at 10:41 AM

The image above shows the light striking the wall to the (photographer’s) left of the statue, which is hardly visible.

Natl Cathedral D-15-11-20-085 ver 01

Photographed at 11:21 AM

Thirty minutes later, the light has moved to the right and begins to illuminate the statue.  By 11:20 AM the statue is fully illuminated and will remain that way for about five minutes.

Natl CathedralD-11-15-20-086

Close-up photographed at 11:22 AM

After a few minutes the light begins to disappear as the sun moves out of position.  See the image below.

Natl Cathedral D-15-11-20-097

Photographed at 11:43 AM

By 11:40 AM, the light was essentially gone.

Keep shooting….

AfterBefore Friday Week 55

Today marks Week 55 in the AfterBefore Friday series managed by Stacy Fischer of Visual Venturing.  It’s open to anyone and participants share their approach of transforming one of their own images into its final form, an expression of their creative vision.  You can find links to all of the other participants here.

I thought this would be a good opportunity to try out one of the new tools that appeared in the most recent Photoshop CC upgrade.  Most writers have been rhapsodizing about the new “Dehaze” tool, but I have been far more pleased by the integration of the Photomerge capability into the Adobe Raw Camera (Version 9.1) process.

Robin Kent ABFriday Week 55 Before

Original Image (one of four)

The above image is one of four used to produce an overall image the front of the Jefferson Memorial at sunrise.  Longtime readers may recall that I used a single image from this set in ABFriday Week 44.  But that was to produce a much tighter crop. This week it will be a wider view to include the tree on the left side of the building and some balance on the other side.  Now, I could have captured all of this in a single image using a wide angle lens, but I wanted to avoid the distortion of an extreme wide angle and I also wanted to be able to make really big prints if the image turned out nicely. (Technical: Four images with a Nikon D800E; 24-70mm f/2.8 lens at 42mm; Exposure: 1/160th sec. @ f/16, ISO 400)

Robin Kent ABFriday Week 55 Screen 01

The Well-Hidden Photomerge Button

The screen capture above shows the Adobe Camera Raw (ACR) display window with the  four RAW images opened as the first step for a photomerge.  In what must be one of the most obscure placements of a functional command in history, Adobe has seen fit to place this teeny little button in the upper left corner of the window, just to the right of the word “Fimstrip”  (Red Arrow).  If you select 2 or more images and then click on that little spot, you get the flyout menu (Yellow Arrow) that is displayed showing several options including “Merge to Panorama.”

Robin Kent ABFriday Week 55 Screen 04

Preview of Photomerge Process

If you click on that command, a preview window quickly appears as shown in the screen capture above. The ACR process has chosen which of three “projections”  it believes will produce the best result which, in this case, was “Perspective”  (Red Arrow). If you are not happy with that one, you can click on one of the other two to compare the results. It also provides a preview of an “Auto Crop” (Yellow Arrow) which essentially cleans up the ragged edges of a typical photomerge process.  A very nice touch, I thought. The image below shows the result when this box is unchecked.

Robin Kent ABFriday Week 55 Screen 03

Auto Crop Unchecked.

In some cases, one may decide to handle the cropping on their own, but it obviously did a fine job here.  Once you are happy with the result,  click on the “Merge” command and it quickly goes to the “Save As” function as shown in the screen capture below.  Just give the file the approapriate name and select the folder in which it is to be saved.  So far about 60 seconds have passed.

Robin Kent ABFriday Week 55 Screen 06

Saving the Merged image

As shown the Screen Capture below, a new thumbnail of the photomerge has appeared in the filmstrip (Red Arrow) and is ready to be processed like any other RAW file.

Robin Kent ABFriday Week 55 Screen 05

ACR Window after Save Command is Executed

From here one just uses their standard workflow.  In this case I used the follwing settings: Highlights decreased to -31; Shadows increased to +73; Whites increased to +57; Blacks increased to +16; Clarity increased to +30; and Vibrance increased to +39.  The image was then opened in Photoshop, where I spent some time removing a few of the people on the steps.  The final result is shown below.

Robin Kent ABFriday Week 55 After

Final Image

Comments and Questions are welcome.  Please be sure to check out the other examples of post-processing techniques at Stacy’s post, ABFriday Week 55.

Keep Shooting…….


Iguazu Falls

Iguazu Falls was the final destination of our journey south last month.  This is one of the great waterfalls on our planet, wider and taller than Niagara Falls and, because it is actually a combination of many separated falls, second in width only to Victoria Falls in Africa. Victoria has an uninterrupted curtain of water one mile wide.  But the one waterfall that would dwarf all others, if it still existed, is the virtually unknown Dry Falls in the state of Washington, USA. With a width of 3.5 miles and a height of 400 feet, it once carried ten times more water than currently flows through all the rivers of the world.  But that was more than 10,000 years ago.

Iguazu 03 3322

The Falls as seen from the Hotel’s Terrace (Argentina Side)

Iguazu Falls cannot be seen all at once unless you are riding in a helicopter.  In fact, you have to travel to another country to see a significant portion. The main feature, the Devil’s Throat, is in Argentina but some spectacular sections are in Brazil.  To appreciate the scale, one should experience both.  Access to most of the sections is not difficult, as long as you don’t mind walking a fair distance in very hot and humid conditions.  It didn’t help that the tour gave us very little time to explore the spectacle, let alone devote enough time to photograph it.

Iguazu 04 3194

About 15 minutes walk from the Hotel

I’ll refrain from describing all the logistical lessons we learned, but anyone who has questions can raise them as a comment and I’ll do my best to answer them.

Iguazu 05 3287_94

Partial View of Devil’s Throat

As the images suggest, the walkways take you very close to the edge of the falls.  The lack of any reference objects makes it difficult to gauge scale. The falls facing each other above are actually part of a continuous loop that goes around behind the camera.  I would guess it is at least a 200-foot drop in the view here.  To give you a sense, the image is a photomerge of 4 separate images taken with my wide angle zoom at 26mm.

Iguazu 06

Grey Crowned Crane

OK, the above image is not a waterfall.  But on our way over to the Brazilian side of the falls the tour company included a stop at a bird “sanctuary.”  It was actually OK if you didn’t desperately want to see (and photograph) Iguazu Falls.

Iguazu 07 8715

Iguazu Falls, Brazilian Side

After the tour of the bird sanctuary and the lengthy processing through Brazilian customs, we finally arrived at Brazil’s national park for Iguazu Falls.  This was quasi-familiar territory since I had discovered Google has a “Street View” of this park during my pre-trip research. (Click Here to see it)  So I knew where to ask that the bus drop me off to maximize the time I had available.  The image above shows the view from the top level of the multi-level viewing structure.  There is an elevator from this point that takes you down

Iguazu 08-8784

Iguazu Falls, Brazil

to here, the lower viewing platform.  The dress code here is somewhat different from Antarctica. From the photographer’s right, there is a ramp that takes you to other viewing locations but I decided to concentrate on this spot.

Iguazu 09 8643_44

Iguazu Falls, Brazil

The above image is a 2-image photomerge taken from about the same spot as the 4 young women in the previous image.  Again, this is a wide angle image (24mm). For the majority of these images I was using a high shutter speed (1/5,000th sec. above).  But since I had a tripod and a variable neutral density filter, a time exposure seemed like it might also be interesting.

Iguazu 10 8704

Iguazu Falls, Time Exposure

I would have liked to stay and continue taking pictures but the bus back to Argentina was about to leave so it was time to go.

Journey to Antarctica – Part 4

First, a quick update on the Herndon ArtSpace Fine Art Photography Competition.  I was quite pleased on Saturday evening to receive a 3rd Place Award for my “Clearing Storm, Yosemite Valley” image (see my previous post here).  Maybe I should do this more often…or should I quit while I’m ahead?   Anyway, back to the saga of the White Continent……….

Antartica Map 03 Version 2

It seems that every Antarctica trip veteran we met before our departure had a different story about the weather.  Although we’ve been there only once, it’s pretty easy to see why.  Even when conditions are not extreme (i.e., enormous waves, huge storms), the weather is still volatile and often localized. This combination can make things very interesting. The following sequence of images on our passage through the Lemaire Channel is just one example.

Antarctica 19

Lemaire Channel, Looking South at Sunrise

Antarctica 20

Lemaire Channel, Looking East  (One Minute Later)

Antarctica 21Lemaire Channel (25 Minutes Later)

Lemaire Channel is about 7 miles long and a mile wide at its narrowest point. Because of the closeness of the sheltering mountains, it can be as smooth as a lake.  Icebergs, however, can block the passage especially earlier in the season.   Our destination was Petermann Island, home to another colony of Gentoo penguins and no iceberg congestion interfered (two images below).

Antarctica 22

Gentoo Penguin Surveys His/Her Domain

Antarctica 23

Gentoo Penguins on Petermann Island

Petermann Island was the southernmost point of our expedition, even though we would not have complained had the captain decided to break ranks and continue on. But such was not the case and that evening we retraced our route through the Lemaire Channel. On the positive side, we were treated not only to some very nice evening light by the setting sun but also the spectacle of a rising full moon (images below)

Antarctica 24

Sunset, Antarctica

Antarctica 25Alpen Glow, Antarctica

Antarctica 26

Moonrise, Antarctica

Next—Paradise Bay and Beyond

After-Before Friday Week 38

First of all, some news to share:  two of my images were accepted as finalists in the 2015 Fine Art Photography Competition at the Herndon ArtSpace Gallery in Herndon, Virginia.  I’m told over 100 photographers submitted entries and 37 images were selected.  The awards will be announced tomorrow night at the Opening Reception, but I am just pleased to have made the cut. The two that were selected are shown below.  Details on the exhibit can be found at www.artspaceherndon.com

Kent Cannon Beach 2

Haystack Rock at Sunset

Yosemite-D-13-05-09-8714

 Clearing Storm, Yosemite Valley

Now, back to the regular weekly Friday feature sponsored by Stacy Fischer of Visual Venturing, a forum open to anyone with an interest in exchanging ideas and experiences about post-processing, sometimes called the “digital darkroom.” The submissions are often surprising, and always interesting.  For those who would like to participate, check Stacy’s site for the guidelines here.

As most people living in the Mid-Atlantic and Northeast regions of the United States already know, the past several weeks have brought us more than our fair share of winter weather.  A week ago, the Washington, DC area set a new record low temperature, so what better time to see if  Great Falls of the Potomac might be frozen solid.   Short answer: No, not really close.  But I took a few shots anyway.

Robin Kent ABFriday Week 38 Before After Dual
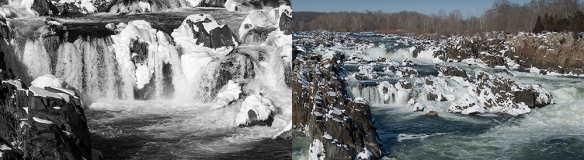
“After” Image                                           “Before” Image

The “Before” image above is the unprocessed RAW image from the camera.  I made a few corrections in Adobe Camera RAW (ACR) as follows:  Whites increased to +44, Blacks decreased to -3 (to set the white and black points), Clarity increased to +28 and Vibrance increased to +25.  The changes were quite minor and hard to detect in the small sizes shown here (image below):

Robin Kent ABFriday Week 38 Before 02

Image with ACR Corrections

The image was then opened in Photoshop CC and it seemed that a Black and White version might be the best way to go. I used a Black and White Adjustment Layer (Blend mode=Normal) and selected the High Contrast Red Filter preset (which imitates the effect of shooting B&W with a red filter).  This was followed with a Curves Adjustment layer (Blend Mode=luminosity) and using the Linear Contrast preset (which adds just a slight increase in contrast).  As a final step, I made a fairly substantial crop to highlight a specific section of the falls.  The final result is shown below.

Robin Kent ABFriday Week 38 After

Final Cropped Image

Please check out the other submissions to this week’s ABFriday Forum here.  And don’t forget the OnePhoto Focus next week in its usual schedule on the first Friday of each month.  Everyone gets to try their hand on an image submitted by one photographer.

Next Post–Back to Antarctica

P.S.  In response to LensAdiction’s suggestion, the image below with a different crop is submitted for discussion.


Robin Kent ABFriday Week 38 After Feedback 02

Thoughts?

Journey to Antarctica – Part 3

Antartica Map 02

Route of Le Boreal, February 1-3

As the ship resumed its southward course, the favorable weather made it possible to navigate the most scenic route to our hoped-for first Zodiac landing.  Neumayer Channel is a 16-mile narrow twisting passage less than two miles wide and bounded on both sides by islands with steep glacial mountains rising as high as 6,000-7,000 feet.  The maze-like route is further complicated by the random appearance of icebergs that have broken away (calved) from the many glaciers on both sides.  A 500-foot ship is not as nimble as the little Zodiacs that would be zipping us around the ice floes. (This Google map lacks much detail, I don’t think the Street View folks have been here yet.)

LT Antarctica 468

Humpback Whale Feeding by Lorraine Turci

On the way, a new group of feeding Humpback whales was spotted and the ship maneuvered for a closer look.  At this point I would like to introduce Lorraine Turci, the ship’s official photographer who used her 400mm telephoto to good effect.  (See image above.) She kindly gave me permission to use some of her images on my blog.  One of the more fascinating habit of whale and dolphins is their practice of creating a “curtain” of air bubbles when they are hunting.  The curtain is often used to corral their prey and we all got a rare opportunity to see this in action.  Lorraine’s image below was far better than mine and gives a great perspective on the complexity of these bubble curtains. Here she used a wide angle (24mm) lens which tells you that this happened right next to the ship. If you look carefully, you can see that a snow flurry came through at this moment.

N_-470

Humpback Whale “Bubble Curtain” by Lorraine Turci

Shortly afterwards, we encountered a pod of 20 Type B Killer Whales, which hunt mostly seals.  Here again, Lorraine worked her magic with the long lens.  (Image below)

N_-478 (process)

Type B Killer Whales by Lorraine Turci

The skies seemed to be opening as we approached the Neumayer Channel (Image below). Prospects for a ride in the Zodiacs seemed good.

Antarctica 17

Approaching Neumayer Channel

Port Lockroy, our destination, is a natural harbor that was used as a whaling station between 1911 and 1931.  During World War II the British established a military presence on a tiny island in the harbor, calling the activity Operation Tabarin.  Explanations vary as to the actual purpose, so feel free to launch your own Google investigation.  Designated a historic site, the base was renovated in 1996, and now serves as a post office, museum, and gift shop whose proceeds are used to fund the upkeep of the site and other historic sites in Antarctica.  Although the practice of sending postcards has become  uncommon these days, that word has not reached Port Lockroy.  It seemed nearly everyone on the ship wanted to send a few and we were no exception.  And never mind that delivery is unlikely to occur anytime soon.

Antarctica 13B

Zodiacs Heading for Port Lockroy

Conditions were perfect for our first Zodiac launch and we bundled up in our red polar coats and waterproof boots. The process of getting lots of people onto these lightweight boats was like a military operation, but a detailed description can wait for now.  We were here to see penguins and mail postcards and buy souvenirs and take pictures.

Argentina 18

Closer View of British Post Office, Museum, and Gift Shop

Antarctica 15

My first shot from a Zodiac

Antarctica 16

Le Boreal at Anchor in Harbor of Port Lockroy


N_-764 (1000 pixel process)

Gentoo Penguin and Chick by Lorraine Turci

Next—Petermann Island

Journey South-Part 2 (Antarctica)

As we boarded the ship that would take us to the White Continent, I recalled our months of planning and preparation, the helpful advice from others who had preceded us, the sage equipment and technical guidance from experienced photographers/bloggers, and the detailed packing lists from the travel company.  (See for example, my guest post on Leanne Cole’s Blog on December 5, 2014.)   But now, looking at the grey skies over the Beagle Channel, we knew that good images depended almost entirely on the region’s infamously volatile weather.

Antartica Map 01

The Route South to Wilhelmina Bay

It takes two days on a cruise ship to cover the distance from Ushuaia to the Antarctic Zone, a voyage that often features very rough seas.  But perhaps our luck was changing. The Drake Passage which had brought grief to so many, seemed not to care about us.  Nevertheless, after nearly 48 hours of remarkably smooth sailing, we reached the passage between the South Shetland Islands and found unpromising conditions.  A heavy fog obscured the channel and the islands were almost invisible.  Not good, I thought, as my camera remained poised but inactive.   The ship’s captain decided to bypass Deception Island, one of the advertised highlight spots for a Zodiac landing. As we traveled south, however, the fog began to lift and about three hours later the scene began to transform (see image below).

Antarctica 08

Shortly afterwards,the clouds descended again and snow flurries began to envelop the ship.  But as I looked over the railing, the telltale sign of the explosive exhalations of humpback whales appeared, and the ship altered course to get closer (see image below).

Antarctica 09

Humpback Whale Alongside Ship

(Technical Data: Nikon D800E with 24-70mm f/2.8 lens, extended to 70mm; exposure 1/160th sec @ f/6.3, ISO 800)

The image above is uncropped, full frame.  The whale was  essentially next to the ship’s hull but was unconcerned by our presence. It became quickly apparent that the combination of low light and the ship’s motion would force some compromises on exposure choices. Normally I would have preferred a lower ISO and smaller aperture to ensure a sharp image.  This would become a recurring theme in the journey.

Less than 4 hours after the encounter with the whales, we arrived in Wilhelmina Bay and were treated to a spectacular combination of clear air and dramatic clouds punctuated by segments of blue sky (see images below).

Antarctica 10

Wilhelmina Bay

(Technical DataNikon D800E with 24-70mm f/2.8 lens, extended to 50mm; exposure 1/800th sec @ f/16, ISO 400)

Antarctica 11

Wilhelmina Bay

(Technical DataNikon D800E with 24-70mm f/2.8 lens, extended to 24mm; exposure 1/640th sec @ f/16, ISO 400)

So far, so good.  A smooth sail across the Drake Passage, it was still early on our first day, and at least a few decent images had already been captured. The next stop was Port Lockroy and, if the conditions permitted, our first Zodiac landing.

Next—Port Lockroy

ABFriday Forum Week 29

Robin Kent ABFriday Week 29A Before 03

After                                                                Before

Each Friday, Stacy Fischer of Visual Venturing hosts a special forum on post-processing where photographers may submit images and describe their post-processing actions to achieve the final result.  This week marks the 29th consecutive episode and I fully expect there will once again be an interesting set of examples by the participants.  Here is the link for the ABForum Week 29 Central Command.  Please check it out.

Robin Kent ABFriday Week 29A Before 01

Original Raw Image

The above image is a “Reject” taken about four years ago and this week the idea was to see if a heroic rescue could be achieved.   After all, I had learned a few tricks since the image was taken and Photoshop has added a ton of new capabilities during that time.   But alas, a transformation from forlorn reject into a splendid representational masterpiece was not to be.

The original image is a long view of the Smithsonian American Art Museum looking north up 8th Street NW in Washington, DC and was taken about 45 minutes before sunrise. (Technical Data: Nikon D700 on tripod with 24-70mm f/2.8 lens extended to 70mm; exposure 3 secs. @ f/13, ISO 200)

The first step, as always, was in Adobe Camera Raw.  The adjustments made were as follows: White Balance changed to tungsten; Exposure increased +0.35; Highlights decreased to -68 to reduce the bright glare of the street lights; Shadows increased to +100 to open up the dark areas; Clarity upped to +38; Vibrance moved up to +37; and Saturation nudged to +8.  The results are shown in the image below.Robin Kent ABFriday Week 29A Before 02

Adjustments in Adobe Camera Raw

Next, a variety of Photoshop actions were taken but there is no need to list them since they did not help much.  This left two choices: another image could be chosen and the process could start all over. Or, I could fall back on the techniques used  in last week’s Forum and abandon realism altogether. In other words, return to the hallucinatory environment known as Photoshop’s Filter Gallery.  So that’s what happened and the image below is the result (Technical details at the end of the post).

Robin Kent ABFriday Week 29A After

Final Image

I’m not sure this is a great result; it might be better if some of the upper portion was cropped out to eliminate the untextured part of the sky. Any thoughts from viewers would be welcome.

Techie stuff about the method:

The image was cropped to eliminate the unattractive foreground.  When using the filter gallery one needs an 8-bit image, a 16-bit file won’t work.  To verify this, just click on Image->Mode and make sure 8 bits/channel is checked in the drop-down menu.  The second rule, at least for those (like me) who don’t have extensive experience with the Photoshop filter gallery, is to just try each option until you find something that works well.

Robin Kent ABFriday Week 29 Before 04

Detail from Filter Gallery Dialog Window

When ready begin, click on Filter–>Filter Gallery and a large display panel will open. A partial screen capture is shown above. The choices are listed on the right side and a preview of the image is displayed in a large panel on the left (mostly not shown).  I started with the variations listed under Artistic (blue arrow) and merely worked my way down looking for one that had some possibilities.  After 8 strikes, I landed on “Plastic Wrap” (red arrow) and, as I did with the others, started adjusting the three controls.  The settings I chose are shown in the screen capture (yellow arrow).

Again, thanks to Stacy for keeping this Forum running smoothly and thanks to the other participants who make this such an interesting weekly event.  Please check out their submissions at Visual Venturing’s  ABFriday Forum Week 29.